 WunderVision
I was working on a project that introduced me to the wild world of image orientation. It is an interesting thing that no one really thinks about how it happens, it just works like magic. An example could be a 1920px wide by 1080px high picture. A regular high definition image.

Now when you have a picture that is in portrait mode, the picture is now 1080px wide by 1920px high.

Or so we are led to believe. The truth is, that is not always the case. And part of it depends on where the picture came from. Was it taken straight from a camera? Was it modified in an image processing program? Was it created from scratch?
What happens, at least from my smartphone, is that the image is captured and stored still at the 1920x1080 size. But an extra piece of information is embedded in the image that specifies that orientation.
There is a bit of metadata stored in a JPEG called EXIF. Exchangeable Image Format. This can contain all sorts of information including Camera Model, Geographic Location, Orientation, Time, Date, etc.
LibTiff defines these values:
ORIENTATION_TOPLEFT = 1;
ORIENTATION_TOPRIGHT = 2;
ORIENTATION_BOTRIGHT = 3;
ORIENTATION_BOTLEFT = 4;
ORIENTATION_LEFTTOP = 5;
ORIENTATION_RIGHTTOP = 6;
ORIENTATION_RIGHTBOT = 7;
ORIENTATION_LEFTBOT = 8;
Now this is all well and good, however the issue comes with how the image is loaded in the browser. My application would allow an image to be captured from the camera and viewed in the browser before uploading to the server. However, depending on if that image came from my phone, a different phone or even done with a different browser, the image would be oriented differently in portrait mode.
To solve this issue, I found a library on github: https://github.com/exif-js/exif-js the provided the tools to parse the exif data of the image and get me the orientation of the image (if it exists), so that I can account for those differences.
Now, me being the way that I am, I like to understand things down to the lowest level possible. And I set out to write my own basic EXIF parser.
I started off with using C# and wrote it using .Net Core since C# is familiar to me and I knew I could implement a basic parser quickly. https://github.com/Corey255A1/BasicCSharpExifParser
There are a lot of different sections and types of information that can be stored in the EXIF area of an image, I was concerned only with a minimal implementation
A JPEG image starts with a 16 bit SOI (Start of Image) 0xFFD8. The next 16 bits indicates the potential start of an Application section. 0xFFE1 is APP1 and that is the EXIF section.
| 2 Bytes | SOI 0xFFD8 |
| 2 Bytes | Application Marker 0xFFE0 - 0xFFEF 0xFFE1 is APP1 (EXIF) |
| 2 Bytes | Length of the App section |
| 6 Bytes | Identifier for EXIF is with 2 nulls. EXIF\0\0 |
| This starts the TIFF Header | |
| 2 Bytes | TIFF Endian Marker Big Endian 0x4D4D Little Endian 0xD4D4 |
| 2 Bytes | TIFF ID |
| 4 Bytes | IFD0 Offset This is the Offset From the start of the Tiff Header where the IFD Tags Start. Usually just 8bytes |
| The Start of the IFD Tags | |
| 2 Bytes | TagCount |
| Then comes TagCount IFD Tags | |
| 2 Bytes | Tag ID |
| 2 Bytes | Tag Type 1: Byte - A single byte of Data 2: ASCII - Null Terminated; If more than 1 Char + Null the string is stored at the offset value. 3: Short - 2 Bytes Unsigned 4: Long - 4 Bytes Unsigned 5: Rational - 8 Bytes (4 Byte Num/4 Byte Den) 7: Undefined - 1 Byte 9: SLong - Signed Long 10: SRational - - 8 Bytes (4 Byte Num/4 Byte Den) |
| 4 Bytes | Tag Byte Count |
| 4 Bytes | Either the Value or the Offset to where the Value is stored. Offset is from the TIFF Header Start |
| If there is an EXIF IFD Tag; the value of that tag is the offset to EXIF IFD Tags. They follow the same IFD format. |
The IFD Types, I found at the Library of Congress website https://www.loc.gov/preservation/digital/formats/content/tiff_tags.shtml
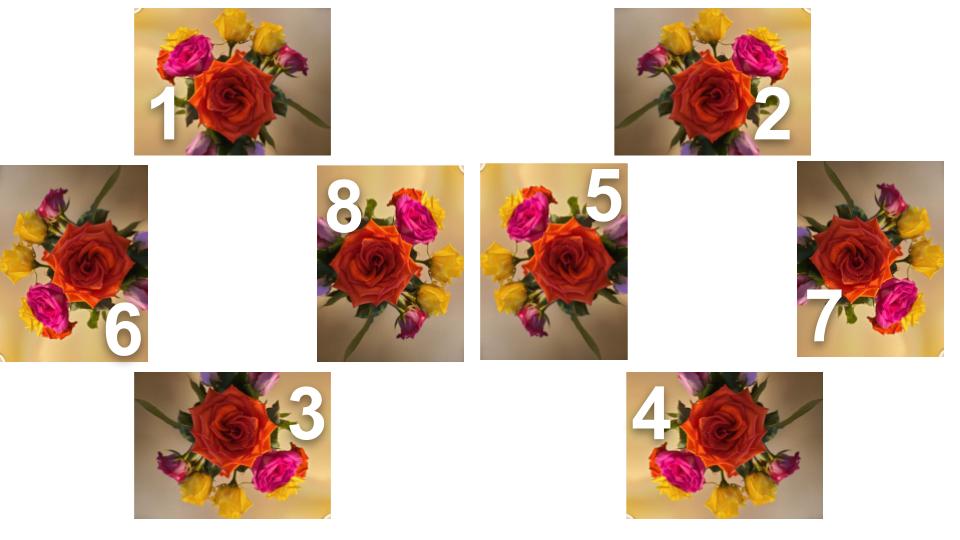
Here are the values output from the original flower images above
As you can see the width and height are the same, but the orientation is different!
Once I had it implemented in C#, my next goal was to do it in C++ with the ultimate goal of compiling it to webassembly https://webassembly.org/ with Emscripten https://emscripten.org/.
That resulted in this https://github.com/Corey255A1/BasicExifReader
Basically the same structure as the C# project, just translating the syntax from one project to the other. I do my development using Visual Studio and the newer versions allow for creating CMake projects. I tried it out for this project and it worked great. To compile to webassembly I created a class entry point for the Emcsripten binding. Then
emcc EXIFParser.cxx EXIF.cpp APP0Marker.cpp BitUtils.cpp IFDEntry.cpp JPEGEXIFFile.cpp -o jexif.js –bind
And out pops a jexif.js and jexif.wasm!
You can see all of the test wrapper code in the repository. The basic usage of the resulting library is writing the file to the webassembly filesystem memory, then creating a new class with the file name as the parameter.
FS.writeFile("uploaded.jpg", new Uint8Array(buffer));
console.log('Written to MEMFS .. Creating Class');
var exifData = new Module.EXIF('uploaded.jpg');
var orientation = exifData.getTag(274);
Ultimately, the size of the webassembly and the supporting emscripten javascript is way more than just using the pure javascript parser. And probably not any faster. But it was a good exercise implementing the documentation in two different languages, and trying out the process of compiling a webassembly library.