 WunderVision
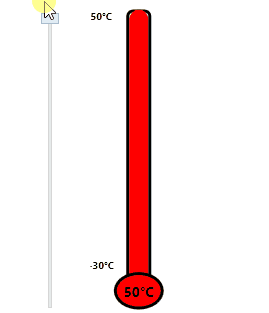
Continuing the trend of churning out some very basic easy to replicate WPF Controls, today I present the Basic Thermometer. Check out Compass Control too!
https://github.com/Corey255A1/MiscWPFControls/tree/master/MiscWPFControls/Controls/Thermometer
This is created purely just using Ellipse and Rectangles, no SVG export needed.
<UserControl x:Class="MiscWPFControls.Controls.Thermometer.Thermometer"
             xmlns="http://schemas.microsoft.com/winfx/2006/xaml/presentation"
             xmlns:x="http://schemas.microsoft.com/winfx/2006/xaml"
             xmlns:mc="http://schemas.openxmlformats.org/markup-compatibility/2006"
             xmlns:d="http://schemas.microsoft.com/expression/blend/2008"
             xmlns:local="clr-namespace:MiscWPFControls.Controls.Thermometer"
             mc:Ignorable="d" Height="292.667" Width="95.333">
    <Grid>
        <Grid.ColumnDefinitions>
            <ColumnDefinition Width="*"/>
            <ColumnDefinition Width="2*"/>
            <ColumnDefinition Width="*"/>
        </Grid.ColumnDefinitions>
        <Grid.RowDefinitions>
            <RowDefinition Height="14*"/>
            <RowDefinition Height="*"/>
            <RowDefinition Height="*"/>
        </Grid.RowDefinitions>
        <Grid Grid.Column="1" Grid.RowSpan="2">
            <Grid.ColumnDefinitions>
                <ColumnDefinition Width="*"/>
                <ColumnDefinition Width="2*"/>
                <ColumnDefinition Width="*"/>
            </Grid.ColumnDefinitions>
            <Rectangle Grid.Column="1" Stroke="Black" StrokeThickness="3" RadiusX="5" RadiusY="5" Fill="White" Name="temperatureTube"/>
            <Rectangle Grid.Column="1" RadiusX="10" RadiusY="10" Fill="Red" VerticalAlignment="Bottom" Height="{Binding TemperatureHeight}" Margin="3,0,3,0"/>
        </Grid>
        <TextBlock Grid.Row="0" Grid.Column="0" Text="{Binding MaxTemperatureStr, FallbackValue=50°C}" FontSize="10" FontWeight="Bold" HorizontalAlignment="Center" VerticalAlignment="Top"/>
        <TextBlock Grid.Row="0" Grid.Column="0" Text="{Binding MinTemperatureStr, FallbackValue=-30°C}" FontSize="10" FontWeight="Bold" HorizontalAlignment="Center" VerticalAlignment="Bottom"/>
        <Ellipse Grid.Row="1" Grid.Column="1" Grid.RowSpan="2" Grid.ColumnSpan="1" Stroke="Black" StrokeThickness="3" Fill="Red" Name="bulb"/>
        <TextBlock Grid.Row="1" Grid.Column="1"  Grid.RowSpan="2" Grid.ColumnSpan="1" Text="{Binding TemperatureText, FallbackValue=-30°C}" FontSize="14" FontWeight="Bold" HorizontalAlignment="Center" VerticalAlignment="Center"/>
    </Grid>
</UserControl>
I start off by splitting up the grid. Using the * Allows the grid to be split up into chunks that are a fraction of the total height or width. For example, if you have two ColumnDefinitions with Width="", what you will have are two columns that are equally sized. If you set one of them to 2 that column will be twice the size of the * column. So the 2* will be 2/3 and the * will be 1/3. Above, the 14* RowDefinition is for the stem of the thermometer. I want it to be 14 times taller than the single *. In this case it will be 14/16 and the other two rows will be 1/16.
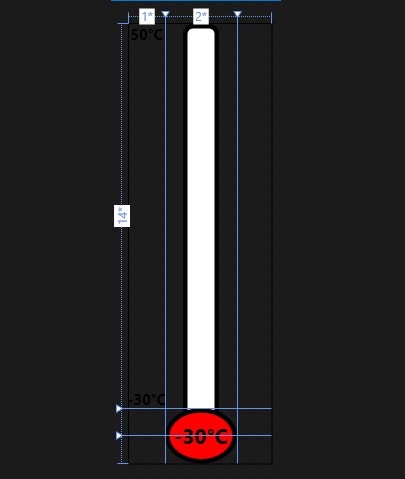
I then created a nested grid in that second long column, and sized it so that it spanned 2 rows. Then in that grid, I create two rectangles, on that is filled white with a border and some border radius to round off the corners. I name this rectangle “temperatureTube” this is important in the code behind when calculating how the fluid responds to temperature change. The second rectangle Height is bound to a TemperatureHeight value which is calculated in the code behind. I set the margin of the left and right side of this rectangle to the strokethickness of the background rectangle.
The two Min and Max labels are set to the first column where the VerticalAlignment is set to bottom and top respectively. These are bound to the Min and Max Temperature strings. I probably could have done something fancy here like create a converter to convert the doubles into a temperature, but this is all about simplicity and bare minimum. The thermometer bulb spans the bottom center grid cells. This ensures that the bulb stays the same relative size to the stem. And finally I added the Textblock in the center of the bulb so that the value of the temperature is displayed.
public static readonly DependencyProperty TemperatureProperty = DependencyProperty.Register("Temperature", typeof(double), typeof(Thermometer), new PropertyMetadata(37.0)); public Thermometer() { this.DataContext = this; InitializeComponent(); }<span style="color: #008800; font-weight: bold">protected</span> <span style="color: #008800; font-weight: bold">override</span> <span style="color: #008800; font-weight: bold">void</span> <span style="color: #0066BB; font-weight: bold">OnPropertyChanged</span>(DependencyPropertyChangedEventArgs e) { <span style="color: #008800; font-weight: bold">base</span>.OnPropertyChanged(e); <span style="color: #008800; font-weight: bold">switch</span> (e.Property.Name) { <span style="color: #008800; font-weight: bold">case</span> <span style="background-color: #fff0f0">"ActualHeight"</span>: { temperatureStep = (temperatureTube.ActualHeight-(bulb.ActualHeight/<span style="color: #6600EE; font-weight: bold">2</span>)) / (maxTemp - minTemp); NotifyPropertyChanged(nameof(TemperatureHeight)); } <span style="color: #008800; font-weight: bold">break</span>; <span style="color: #008800; font-weight: bold">case</span> <span style="background-color: #fff0f0">"Temperature"</span>: NotifyPropertyChanged(nameof(TemperatureHeight)); NotifyPropertyChanged(nameof(TemperatureText)); <span style="color: #008800; font-weight: bold">break</span>; } } }
As discussed in Compass Control, the DependencyProperty is used for when you need to bind this property in xaml from a different control or window. So I created the Temperature DependencyProperty to be set from the demo window. Also like in Compass Control, I overrode the OnPropertyChanged. I’d like to find out if there is a more WPF way to do the things I’m doing with it, but until then, this works. When ActualHeight is changed, I calculate the Temperature to Height step. I off set this by half the bulb height This is so that when the Minimum Temperature is set, it ends right at the top of the bulb. I then send out a notify that the TemperatureHeight has changed to that it can rescale the fluid rectangle. When the Temperature dependency property is changed, I send out the notifications that the Height and Text has changed so that things bound to those can update.
        public double TemperatureHeight
        {
            get => bulb!=null?((Temperature-minTemp) * temperatureStep) + (bulb.ActualHeight / 2): ((Temperature - minTemp) * temperatureStep);
        }
When the TemperatureHeight is accessed, I calculate the new height of the fluid rectangle with the bulb offset.
        private double maxTemp = 50.0;
        public double MaxTemperature
        {
            get => maxTemp;
            set
            {
                maxTemp = value;
                temperatureStep = (temperatureTube.ActualHeight - (bulb.ActualHeight / 2)) / (maxTemp - minTemp);
                NotifyPropertyChanged(nameof(TemperatureHeight));
                NotifyPropertyChanged(nameof(MaxTemperatureStr));
            }
        }
        public string MaxTemperatureStr
        {
            get => $"{(int)maxTemp}°" + (isCelsius ? "C" : "F");
        }
Min and Max Temperature calls similar code, where if the are changed, notify that the Height needs to be recalculated and the the Str should be refreshed.
       private bool isCelsius = true;
        public bool IsCelsius
        {
            get => isCelsius;
            set
            {
                isCelsius = value;
                NotifyPropertyChanged(nameof(MinTemperatureStr));
                NotifyPropertyChanged(nameof(MaxTemperatureStr));
                NotifyPropertyChanged(nameof(TemperatureText));
            }
        }
And change the labels based on if the display should be Fahrenheit or Celsius.
On the main window, add the control.
<Thermometer:Thermometer Grid.Column="1" HorizontalAlignment="Center" Margin="108,10,107,13" VerticalAlignment="Stretch" Temperature="{Binding Value, ElementName=tempSlider}" IsCelsius="True" MinTemperature="-30"/>
I set the MinTemperature to -30 (The MaxTemperature is default 50) and set it to IsCelisus=“True”
I added a vertical slider bar with the name tempSlider, and this I bind its Value directly to the Temperature of the Thermometer using the “{Binding Value, ElementName=tempSlider}”. No backing code required for that.
And that is as simple as it gets!
P.S. I was looking for a way to create this simple animation and found a neat tool called ScreenToGif: https://www.screentogif.com/ https://github.com/NickeManarin/ScreenToGif Very simple to use and worked great!